
Registering or Deleting from the Operator Panel
You can register up to 300 destinations to speed dial.
You can create up to 20 groups, and register the entire groups as speed dial numbers.
Registering Fax Numbers by Entering One by One
For details on character entry methods, refer to "Entering Characters".
Memo
The numbers that are registered in groups with the [Speed Dial] function synchronize the numbers that are registered in groups with the [Group No.] function.
-
Press
 (SETTING).
 -
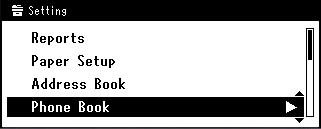
Press
 to select [Phone Book], and then press
  (OK).
(OK).
-
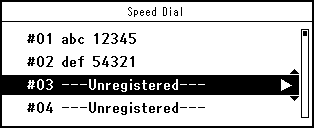
Check that [Speed Dial] is selected, and then press
(OK). -
Press
to select a speed dial number, and then press (OK).
Memo
You cannot select the speed dial numbers that are used with the reserved transmission or auto delivery.
-
Check that [Register] is selected, and then press
(OK).Memo
To edit a registered speed dial number, select [Edit].
-
Check that [Name] is selected, and then press
 .
. -
Enter a name.
You can enter up to 24 characters.
-
Select [Enter], and then press
(OK). -
Press
to select [Fax Number], and then press (OK). -
Enter a fax number.
You can enter up to 40 digits.
-
Select [Enter], and then press
(OK). -
Press
to select [Group No.], and then press . -
Press
to select a group number (01 to 20).
The check box is selected. You can select multiple items.
-
When you complete the selection of all the groups, press
. -
Check that [Group Selection Completed] is selected, and then press
(OK). -
Press
(OK).
Registering a Destination that was Specified Before (History)
You can register fax numbers as speed dial numbers from the fax transmission history and the reception history.
-
Press
 (FAX).
 -
Check that [Fax] is selected, and then press
(OK) to display the start screen.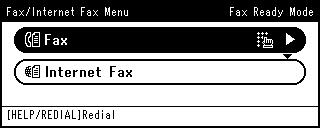
-
Press
to select [Fax History], and then press (OK).
-
Press
to select [Tx History] or [Rx History], and then press (OK).
-
Press
to select an item, and then press (OK).
-
When you check the item content, press
. -
Check that [Register To Speed Dial] is selected, and then press
(OK). -
Press
to select a speed dial number, and then press (OK).
Memo
You cannot select the speed dial numbers that are used with the reserved transmission or auto delivery.
-
Check that [Register] is selected, and then press
(OK).Memo
To edit a registered speed dial number, select [Edit].
-
Check that [Name] is selected, and then press
. -
Enter a name.
You can enter up to 24 characters.
-
Select [Enter], and then press
(OK). -
Press
to select [Fax Number], and then press (OK).The fax number is automatically entered.
-
Select [Enter], and then press
(OK). -
Press
to select [Group No.], and then press . -
Press
to select a group number (01 to 20).
The check box is selected. You can select multiple items.
-
When you complete the selection of all the groups, press
. -
Check that [Group Selection Completed] is selected, and then press
(OK). -
Press
(OK).
Registering Multiple Addresses as a Group (Group Dial)
For details on character entry methods, refer to "Entering Characters".
Memo
The numbers that are registered in groups with the [Speed Dial] function synchronize the numbers that are registered in groups with the [Group No.] function.
-
Press
(SETTING). -
Press
to select [Phone Book], and then press (OK).
-
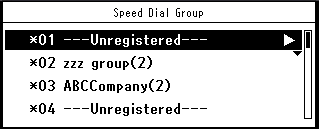
Press
to select [Group No.], and then press (OK). -
Press
to select a group number, and then press (OK).
-
Check that [Register] is selected, and then press
(OK).Memo
To edit a registered address, select [Edit].
-
Check that [Name] is selected, and then press
. -
Enter a name.
You can enter up to 16 characters.
-
Select [Enter], and then press
(OK). -
Press
to select [Speed Dial], and then press (OK). -
Press
to select a speed dial number (01 to 300), and then press (OK).The check box is selected. You can select multiple items.
You can register up to 100 speed dial numbers in a group.
-
When you complete the selection of all the numbers, press
. -
Check that [Complete] is selected, and then press
(OK). -
Press
(OK).
Deleting a Registered Speed Dial Number
Note
You cannot delete the speed dial numbers that are used with the reserved transmission or auto delivery.
-
Press
(SETTING). -
Press
to select [Phone Book], and then press (OK).
-
Check that [Speed Dial] is selected, and then press
(OK). -
Press
to select a number to delete, and then press (OK).
-
Press
to select [Delete], and then press (OK).
-
Press
 or on a confirmation screen, select [Yes], and then press (OK).
Deleting a Registered Group Dial Number
Memo
Even if you delete a group, the numbers that are registered as the speed dial numbers are not deleted.
-
Press
(SETTING). -
Press
to select [Phone Book], and then press (OK).
-
Press
to select [Group No.], and then press (OK). -
Press
to select a group number, and then press (OK).
-
Press
to select [Delete], and then press (OK). -
Press
or on a confirmation screen, select [Yes], and then press (OK).