
Specifying a Document Type
If you select a document type, the document can be scanned at the most suitable quality.
-
Press
 (SCAN).
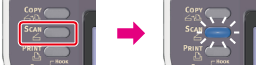
-
Set a document in the ADF or on the document glass.
-
Select a scan type from [Scan Menu], and then press
 (OK).
(OK). -
Press
 to select [Scan Setting], and then press (OK).
-
Press
to select [Image Settings], and then press (OK).
-
Press
to select [Document Type], and then press (OK).
-
Press
to select a document type, and then press (OK).Available type settings
Text,
 Text&Photo*,Photo,Photo (Glossy)
* indicates the factory default setting.
Memo
-
[Text]: Set when copying a text document.
-
[Text&Photo]: Set when copying a document having texts and photos. The well-balanced text and photo are reproduced on an image.
-
[Photo]: Set when copying photos and graphic documents. Images are reproduced with the focus on grayscales. In [Photo] mode, it takes longer to scan.
-
[Photo (Glossy)]: Set when copying photo documents printed on a glossy silver halide photography or glossy inkjet paper. Images are reproduced with the focus on grayscales in consideration of the glossy.
Note
-
If you select [Text], the gray level may decrease depending on the document.
-
If you select [Photo] or [Photo (Glossy)], fine texts or lines may be blurred depending on the document. It takes longer to scan.
-
If you select [Photo (Glossy)], images may be bright.
-
-
Press
 or
or  .
.Scanning starts.