
Setting Margins (Margin)
The margin function enables you to set margins. This function is useful when you want to staple or punch holes in copies. You can set the top, bottom, right, and left margins by specifying the [Top] and [Left] values.
Note
-
A part of a document may not be copied.
-
The specified margin values stay the same even after you change the zoom rate.
-
To copy a document in your preferred orientation, specify the orientation in [Direction] in advance.
Memo
-
If all the values are set to [0], [Margin] is disabled.
-
You can set [Margin] as default so that you do not have to set margins every time you make copies.
-
The value of the margin can be changed from [Admin Setup] > [Copy Setup] > [Default Settings] > [Margin] > [On] > [Margin].
Copying with Margins on One Side
Set margins to a simplex document before copying.
-
Press
 (COPY).
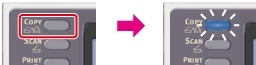
-
Set a document in the ADF or on the document glass.
-
Press
 to display the [Change Settings] menu.
 -
Press
 to select [Margin], and then press
  (OK).
(OK).
-
Press
to select [ON], and then press (OK).

-
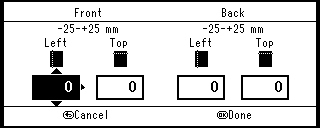
To set the left or right margin, press
and  , specify a margin in [Left] of [Front], and then press .
 -
To create a margin on the left side of the output, specify a positive value.
-
To create a margin on the right side of the output, specify a negative value.
-
-
To set the top or bottom margin, press
and , specify a margin in [Top] of [Front], and then press (OK). -
To create a margin at the top of the output, specify a positive value.
-
To create a margin at the bottom of the output, specify a negative value.
Memo
You do not need to specify the [Back] margin when copying on a single side.
-
-
Press
 (START).
Copying starts.
Copying with Margins on Both Sides
When you make duplex copies with [Margin] enabled, you must specify the [Back] margin.
-
Press
(COPY).
-
Set a document in the ADF or on the document glass.
-
Set duplex copy.
-
Press
to display the [Change Settings] menu. -
Press
to select [Margin], and then press (OK). -
Press
to select [ON], and then press (OK).
-
To set the left or right margin, press
and , specify a margin in [Left] of [Front], and then press . -
To create a margin on the left side of the output, specify a positive value.
-
To create a margin on the right side of the output, specify a negative value.
-
-
Likewise, press
and , specify a margin in [Left] of [Back], and then press . -
To create a margin on the left side of the output, specify a positive value.
-
To create a margin on the right side of the output, specify a negative value.
Memo
Specify the same absolute value set in the [Left] margin for both the [Front] and [Back] margins.
-
-
To set the top or bottom margin, press
and , specify a margin in [Top] of [Front], and then press . -
To create a margin at the top of the output, specify a positive value.
-
To create a margin at the bottom of the output, specify a negative value.
-
-
Press
or to specify the [Top] margin for [Back], and then press (OK).-
To create a margin at the top of the output, specify a positive value.
-
To create a margin at the bottom of the output, specify a negative value.
Memo
Specify the same absolute value set in the [Top] margin for both the [Front] and [Back] margins.
-
-
Press
(START).Copying starts.
Memo
-
The margins' positions conform to [Direction].
If [Direction] is [Portrait], the short side becomes the upper and lower ends and the long side becomes the right and left ends. If [Direction] is [Landscape], the long side becomes the upper and lower ends and the short side becomes the left and right ends.
-
When using the document glass, Continuous Scan mode is automatically enabled. Follow the on-screen instructions.